
NOTE: There is now an easier solution – the USB2AX adapter. For details, look here.
The OpenCM9.04 is a micro controller board based on 32bit ARM Cortex-M3. The OpenCM’s schematics and source codes are open-source. There are two types available, the Type A and Type B. The difference between Type A & Type B is the availability of the connectors.
For detailed schematics and block diagrams of the OpenCM9.04 we recommend visiting the Robotis website.
Installing the OpenCM
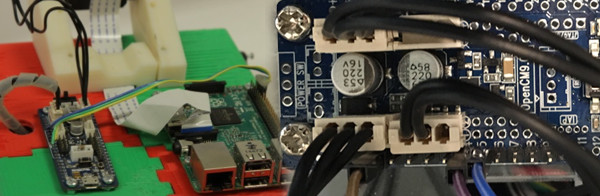
 Refer to the wiring diagram on the power page for instructions on how to create the wiring harness for the robot.
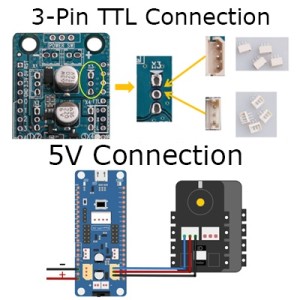
The OpenCM passes power through to the Dynamixel daisy chain as well as the Rx/Tx communication packets. As such sufficient power is required to power all of the Dynamixels. OpenCM9.04’s Dynamixel 3-Pin TTL pins are all compatible with Dynamixel 3-pin TTL and XL-320 3-pin TTL (mini type). Thus both can be soldered and used. Both types of 3-pin TTL pins are included in OpenCM Accessory Set.
If you purchase an OpenCM9.04A (Type A) you will have four 3-pin TTL connections. This will allow you to use one of these jumpers to send power through the Dynamixel daisy chain and leave a connection for the wheels and a connection for the arm. This is the preferred method and is illustrated in the aforementioned wiring diagram.
Alternatively, you can connect power directly to the 5V power pins as shown in the picture to the above.
Programming the OpenCM
 The OpenCM board is a similar architecture to Arduino and, as such, uses a similar code. Robotis has an IDE Software which contains a library for easy controlling of the Dynamixel Servos. You can download the Robotis IDE from here.
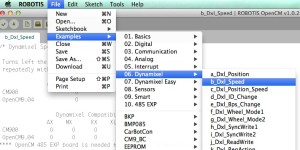
Once downloaded and installed you will be able to find examples scripts under “File > Examples > Dynamixels”. Their libraries will handle the serial communication between the Servos as mentioned above. In the OpenCM page we have provided a sketch onto your OpenCM to allow communication between the Raspberry Pi and the servos, but you can control the servos directing through the Open CM.
Starter Code
Python is a easier language for student to grasp. This is why we are connecting it to the Raspberry Pi (along with a couple other benefits). As mentioned previously the OpenCM acts as a serial tosser which sends communication packets between the Raspberry Pi (from user inputs) to the Dynamixels.
The following is a base level code which has been developed to get the robot up and moving and so that learning can begin quickly in the classroom. The code is in no way perfect and we invite improvements.
Dynamixel Dxl(1);

void setup()

{

Serial2.begin(57600);

Dxl.begin(3);

}

byte blockingRead()

{

while (!Serial2.available()) delay(10);

return Serial2.read();

}

boolean readInt(int *outVal)

{

byte inBuffer[sizeof(short)];

int i;

for (i = 0; i < sizeof(short); i ++)

{

inBuffer[i] = blockingRead();

}

*outVal = *((short*)inBuffer);

return true;

}

void processWrite(byte cmd, byte id)

{

switch (cmd)

{

case 'j':

{

//Set Joint Mode

Dxl.jointMode(id);

break;

}

case 'w':

{

//Set Wheel Mode

Dxl.wheelMode(id);

break;

}

case 's':

{

//Set Speed

int add, val;

if (!(readInt(&add) && readInt(&val))) break;

//Dxl.writeWord(id, add, val);

Dxl.goalSpeed(id, val);

break;

}

case 'p':

{

//move to position

int pos, vel;

if (!(readInt(&pos) && readInt(&vel))) break;

Dxl.setPosition(id, pos, vel);

break;

}

case 'g':

{

//General write command

int add, val;

if (!(readInt(&add) && readInt(&val))) break;

Dxl.writeWord(id, add, val);

break;
//examples of using writeWord()
//Dxl.writeWord(id, 30, val); //move to Goal Position
//Dxl.writeWord(id, 32, val); //move at Speed
//Dxl.writeWord(id, 8, 0); //set wheel mode
}
}
}
void processRead(byte cmd, byte id)
{
/* Gets sent some ‘complex’ command in the cmd byte and then executes */
switch (cmd)
{
case ‘j’:
{
//read current joint position
char str[4]; //create an array of characters
int output = Dxl.readWord(id, 36); //query the dynamixel
itoa(output, str, 10); //turns integer to ascii
//return Position. Values between 0-999
Serial2.write(str);
break;
}
case ‘m’:
{
//read if wheel is moving
char output = Dxl.readWord(id, 46); //query the dynamixel
Serial2.write(output);
break;
}
case ‘s’:
{
//read current speed
char str[4]; //create an array of characters
int output = Dxl.readWord(id, 38); //query the dynamixel
itoa(output, str, 10); //turns integer to ascii
Serial2.write(str);
break;
}
}
}
void loop()
{
while (Serial2.available())
{
// Wait for a start byte, “W” for write or “R” for read.
byte inByte = blockingRead();
switch (inByte){
case ‘W’:
{
byte cmd = blockingRead();
byte id = blockingRead();
processWrite(cmd, id);
break;
}
case ‘R’:
{
byte cmd = blockingRead();
byte id = blockingRead();
processRead(cmd, id);
break;
}
}
}
}
The raw sketch is available for download from the following GitHub repository.